
Ever get the urge to edit some audio but you’re not sure where to start? Settle in with this HTG guide to the free audio editor Audacity that’s written for beginners but caters to geeks of all levels.
Note: this is the first article in a multi-part series that we’ll be covering over the next few weeks.
Oh, the Audacity!
In this series, we’ve chosen to highlight a particular application, Audacity, because of a few important reasons. It’s free, which is always optimal. It’s open source, and that’s always appreciated by geeks like us. It’s cross-platform, so even though our guide is done in Windows, OS X and Linux users can play, too. It’s got great plug-ins and amazing effects right out of the box.
Perhaps most importantly, though, while more advanced apps like Adobe’s Soundbooth or Apple’s GarageBand get the job done, they’re designed for more experienced users and for more involved projects. Audacity can help you understand simpler concepts of audio editing that can be transferred to those more powerful programs.
Hop on over to the Audacity download page, and be sure to choose the 1.3 series, as that’s the most compatible with the latest OS releases. If you use Linux, you can just grab it from your repository. We’ll leave the extra add-ons for another day.
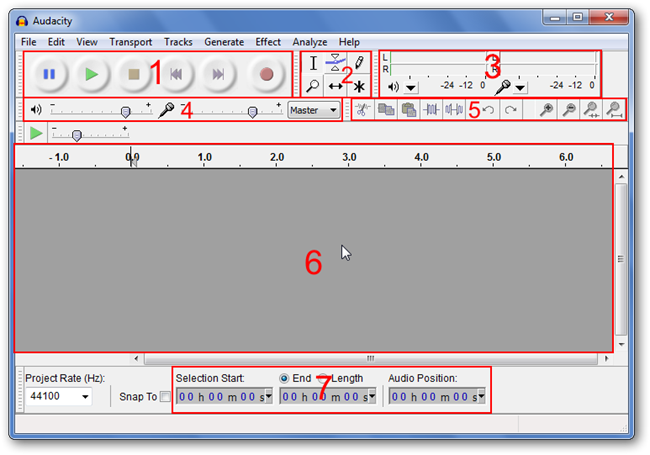
User Interface
There’s a lot of options in the main window, but it breaks down pretty simply. Let’s take a look.

- Audio controls: The standard controls – pause, play, stop, skip backward, skip forward, and record – for the project as a whole.
- Toolbar: In order, from top-left to bottom-right: Selection, Envelope, Draw, Zoom, Time Shift, and Multi-Tool Mode.
- Level meters: The left one is for output, and the right is for input. Clicking on the the input meter will actively monitor audio levels, and right clicking will give you options to change the refresh rate.
- Level sliders: Change the volume level for both output and input, and the drop-down menu to the immediate right is to select an input.
- Shortcut bar: Shortcuts to quick actions – such as cut, paste, insert silence, etc – and for zooming.
- Audio tracks: The top of this area has the timeline, and any audio tracks will appear here. More on that in a bit.
- Selection tools: Here, you can choose where to start selection by time, and then choose to put in an end time, or a length of selection.
There’s a lot here, but we’ll go into more depth in future articles in this series.
Recording a Track
Let’s get a track recorded to illustrate some basic editing. Audacity uses Windows audio defaults for recording and playback with few exceptions, so go down to your system tray, right-click your volume control, and go to “Recording Devices”.

Make sure your microphone is set to be the default device. Then, in Audacity, just click the “Record” button up top. It’s the one that has a small red circle in the center.
You’ll see something like this appear:

Audio Tracks
Let’s take a closer look at the audio track and it’s associated stuff.

- Timeline: Here you can see the lengths of your audio tracks.
- Audio Track Properties: The pertinent audio properties can be found here and changed. Tracks can also be removed by clicking on the tiny “X” in the upper-right corner. Volume and balance can be adjusted by moving the sliders.
- Scrubber: This green arrow usually has a line running down the screen as well. It appears when you hit “Play” and marks the location of the waveform that is currently output through your speakers.
- Left Channel Audio Waveform
- Right Channel Audio Waveform
As you can see, there’s a wealth of information displayed here. Any added tracks will stack vertically in this portion of the screen so you can see the information from all of them.
Saving Your Project
When you’ve made some edits but you’re not quite done with your project, you can save it for later. Go to File > Save Project As…

You’ll see a warning pop up, reminding you that this just for use with Audacity itself. Following that, you’ll get a normal save prompt. That’s it!

Exporting Audio
If you want to get your audio track, with all of its layers and effects, into a single finished file, you’re going to want to export it. Go to File > Export…

You’ll see a different save dialog pop up.

After giving it a name, you can change the type of audio file you’d like to encode it as. There are more than a few options.

After you choose your type, you can click on the “Options…” button to change things like the bitrate. I left mine as a “WAV” file for now. You may need additional codecs to be able to use other options, but that’s something we’ll cover in a future article.
As you can see, we’re just touching on the basics of using Audacity, but rest assured, we’ve got some interesting articles coming up soon. We’ll cover the tools you’ll use, filters, effects, and even some extra fun stuff, so stay tuned!


No comments:
Post a Comment